Our Gladiator Rubicon Ecodiesel was bottoming out on the Bump Stops. I had put on a steel bumper and winch, causing the stock Rubicon Fox Shocks to struggle with the extra weight. While it was somewhat disappointing, it provided a perfect opportunity to enhance the suspension. I opted for the Mopar 2" Lift Kit With Bilstein Remote Reservoir Shocks.
Muddy Ruttzz Youtube Channel
My Blog Posts are unsponsored and gear you see I use in my outdoor adventures.

Support Us! Muddy Ruttzz earns a commission from ✅ affiliate links in this article. Learn More
3 Days Spent in My Driveway To Install Jeep Lift Kit
Creating a video for this demanding project set a high standard, and I took on the task independently, as I typically do. While not an instructional video, it can assist you in determining whether you are up for a installing a Jeep Lift Kit. Ultimately, everything fell into place, and the Gladiator now runs smoothly.

An Extremely Stylish Collectable Crate Packed With Lift Kit Components
The Mopar Kit consists of meticulously designed components that seamlessly enhance the Jeep. Mopar offers a kit tailored to every vehicle and engine pairing. Each Coil Spring and shock is designated with a part number corresponding to a specific corner of the vehicle. Jeep has anticipated the need for lifting your vehicle. Stock Jeep Wranglers and Gladiators come equipped with 2" of extra length in the brake, electrical lines, and differential breather tubes.


There is nothing quite like the excitement of getting your parts crate and uncovering its contents. To lift the Jeep, you will need new coil springs, shocks, control arms, bump stop extensions, sway bar links, and installation instructions.
Related Content

Not knowing the front end components, I had to carefully read the instructions. They seemed more suitable for a mechanic, serving as a general guide. Experience is invaluable. If I were to install another lift, I would approach it differently.
Ensure that you verify the torque specifications. Correct torque is essential for both performance and safety.


A Few Tools You Will Need To Install A Mopar Jeep Lift Kit Or Any Other One You Might Choose
I had a lot of tools I needed in my garage and I had to buy a few new ones.
Some Tools I Already Had In My Garage
Set of Metric wrenches up to 24 mm
Metric socket set 1/4", 3/8", 1/2" drive up to 24 mm sockets
Metric Allen Wrenches
75 lbs torque wrench
Lug nut torque wrench
Impact drill motor
Some Tools I had To Buy
200 lbs 1/2" drive torque wrench (Control Arms Torque 185 foot pounds)
Floor Jack that has ability to lift tall vehicle
Jack Stands that will safely hold the vehicle up
1/2" Breaker Bar - long for leverage (mine was cheap and too flexible)
This list is not by any means complete.

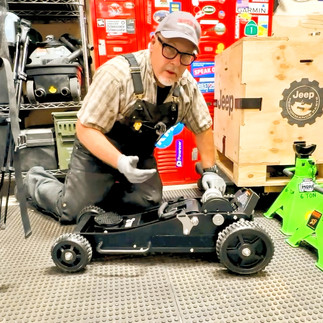
Working In The Driveway Is More Difficult - Working On Any Vehicle On Jack Stands Is Inherently Dangerous (Safety Tips)
When working in a driveway, I make sure to place the removed tire under the vehicle for added safety in case it falls. In my area, it's not safe to leave the vehicle on stands with the tires off. It's preferable to have access to a garage where the whole vehicle can be lifted and kept that way until the work is completed. Using a lift is the optimal choice. Great Torque Wrench Is Required.

Loosening And Tightening Bolts On Control Arms And Track Bar: Step 1 Of The Lift Install Process (Proper Torque Wrench Usage)
It takes some strength to lie beneath the vehicle and tighten the bolts with 185 foot pounds of torque. It's also a chance to scrape some knuckles. It's a bit daring for a man in his sixties to do this.

Using Jacks to Support Both Sides of the Front Axle
Having a jack on each side of the solid axle serves to protect the drive shaft and other components from damage. This setup also enables you to adjust the axle by raising and lowering each side as required, which is essential for removing and installing coil springs. A Jack That Goes High Enough To Lift A Lifted Vehicle


Dismantling the Original Suspension Parts: Getting Ready to Install New Suspension Components (Learn About Jeep Suspension)
To start, unplug the Differential Electric Connector, free up the additional 2 inches of Brake Line included in the Jeep, and detach a clip from the Diff Breather Tube. Afterward, you'll be able to safely remove the sway bar link, shock, and lower the axle without causing any harm to them.


Lower Control Arms Are First New Parts To Get Installed
When compared directly, as shown in the first picture above, the new Lower Control Arms don't seem significantly different from the stock ones. Ensure that you have already loosened the bolts that connect the Axle Side and Frame Side. By utilizing the jack to raise and lower the axle, along with my drift pins and hammer, I could easily align the holes and attach the bolts.


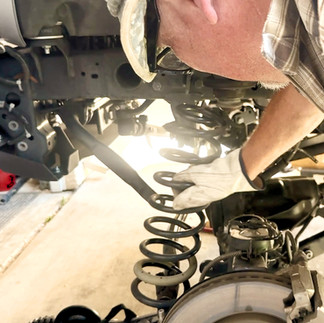
Front Springs Are Next To Get Installed
The new coil springs are progressive, unlike the old ones which may not be. Additionally, the new springs are 2 inches longer due to the 2-inch lift. Progressive springs become firmer as they compress more, while still offering a relatively comfortable ride.
You have to reuse the upper coil spring isolators. I secured them in place using blue painters tape during the spring installation. Double-sided tape was used on the rear (better idea.) The fourth picture illustrates the process of installing the spring. Remember to insert the new Bump Stop Extension into the coil before installing the spring.
Hit A "Bump In The Road" Installing The Front Bump Stop Extensions
Front Bump Stop Extensions turned into a nightmare to install. It was so bad I had to create this sperate video to explain it.


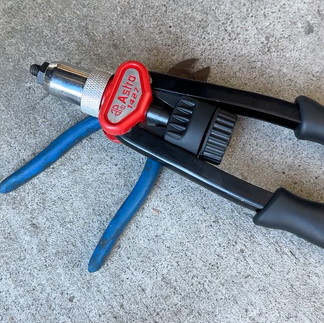


Note On Installing The Bilsteins Shock Reservoir On The Frame (Why Reservoir Shocks?)
Encountered a further setback during the installation of the bracket for the Shock Reservoir on the frame. The kit is designed to use existing holes. However, one of the nutserts provided was too small for the designated hole in the frame. After searching through my collection of rivnuts, I managed to find only 2 of the appropriate size. I used my rivnut tool to set them in place and finished the installation successfully.

New springs, shock absorbers with reservoirs, sway bar links, bump stop extensions installed on passenger and driver side.
Time To Install New Suspension On Rear Of Gladiator


Rear Installation Is Of The Bilstein 2" Lift: Much The Same As The Front But Easier
Once the Gladiator has been lifted and placed on stands, the next step is to loosen the bolts securing the track bar, upper control arms, and lower control arms. Support the rear axle on both sides, then proceed to remove the stock springs, sway bar link, and shocks.


In the Gladiator, the Rear Coil Spring is positioned within the Coil Spring Retainer at the top. The Rubber Coils Spring Isolator is retained for reuse. This component serves to avoid direct metal contact, provides cushioning for the spring, and ensures correct positioning.
Installing the new spring and holding the isolator simultaneously is not feasible. To overcome this challenge, I resolved the issue by utilizing double-sided tape to secure it in position. Upon closer inspection, you will notice the rubber pin that aligns with a hole on the retainer to ensure correct placement.

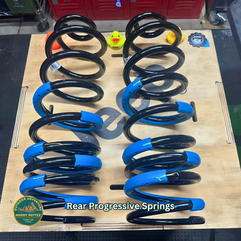
The New Progressive Rear Spring
New spring is stout looking and it is easy to see the tightly wound coils at the top that make it progressive.

Removing and Hanging The Brake Caliper
In order to lower the rear axle sufficiently to install the new longer coil spring, I needed to take off the brake caliper. Otherwise, the brake lines would have been too taut.

New Coil Spring Installed
After lowering one side and raising the other side the the axle I was able shoe horn the new spring in using a flat bar.

Ready To Install The New Bilstein Shock
Rear shock reservoir piggybacks on to the shock with a nicely made aluminum bracket.

2" Bump Stop Extension Bolts On To The Existing Bump Stop
The black rectangle in the photo is the new bump stop extension.

Installation Complete: Looks Totally Awesome
New coil spring, Bilstein Shock, sway bar end link and bump stop extension installed on passenger and driver side of Gladiator.

Time To Re-Torque Track Bar and Control Arm Bolts
After putting the tires back on and lowering the Jeep Gladiator to the ground, I can now begin retightening all the bolts that I had previously loosened. Some of the bolts require a torque of 185 foot pounds. I had to buy a longer 1/2" drive wrench to provide more leverage. The blue cam strap is holding my backup wrench freeing up both hands to tighten the bolts.
Jeep Looks Great And The 35" Tires Have More Room For Articulation: Roughly 2 1/2" Taller With A 2" Lift
Took the Gladiator for a ride and it drove pretty well although the steering wheel was not longer centered. No problem, it was going to my local 4X4 shop for a alignment. After alignment the Gladiator just felt like a whole new vehicle. Huge upgrade from the stock Fox Shocks that came on the Rubicon model Gladiator.
Instruction manual had a page with new alignment specs. According to the shop they were not for this truck. Fortunately they knew the proper specs.

2550 Mile Test Of The New Lift Towing Our Trailer
Lift kit installed, we hooked up our Exventure XV-3 and drove from Norther California to Las Cruces New Mexico. Awesome performance. Jeep just felt so much better.
A Quick List Of Steps Required To Install A Lift Kit On A Jeep Gladiator Or Wrangler JL
Jack up the vehicle and set it safely on jack stands or a lift
Remove tires
Loosen Track Bar and Control Arm Bolts
Remove electrical connectors on differential and remove zip ties from brake and electrical lines to free extra 2" Jeep provides.
Remove stock components
Install new components
Re-attach electrical connectors
Re-install tires
Re-torque all bolts that were loosed to Mopar specs
Test drive and get a alignment
Enjoy your lifted Jeep


Conclusion:
The reason behind my decision to install the Mopar 2" Lift Kit was due to the Gladiator hitting the bump stops after I added a Warn Bumper and Winch. The increased weight was too much for the stock Fox Shocks, prompting the need for additional clearance for off-road adventures.
Recording the project on video served as an additional source of motivation. The task of working solo in the driveway, both installing and filming, proved to be challenging. It consumed nearly three full days to finish. At the age of 63, I seriously doubted my decision-making. I found myself questioning the wisdom of wriggling under a vehicle when I could have easily hired a professional for the installation.
Despite encountering some difficulties, I managed to successfully complete the installation and the video. This experience made me feel like I had achieved a significant accomplishment. As a result, I not only gained valuable knowledge and confidence but also developed a stronger bond with the Gladiator Ecodiesel.
Merch Section
Support Me in Producing Quality Content. Use My Links to Buy These Amazing Products. I will get a small commission when you do. (No extra cost to you.)
Amazon Shopping
✅ - Mopar Bilstein Lift Kit Delivered In Collectible Crate - Be sure to order the proper lift kit for your vehicle/engine combination (Amazon)
✅ - Everything For Jeeps Here (Amazon)
✅ - Amazon Purchases - Use This Link To Shop For Anything On Amazon
Ebay Shopping
✅ - Leatherman Multi Tools Made In USA (eBay)

Muddy Ruttzz Website Merch Page Click Here!
✅ - Zarges Aluminum Cases - Best Made Overlanding Storage Cases. When you require the best protection for you gear. Bear Resitant available. (Zarges)

✅ - MERCH - Great Muddy Ruttzz Clothing.
Click Here to See my Zarges Blogpost.
As a Amazon Affiliate and Ebay Partner I receive a commission if you use my links to make a qualifying purchase. It does not raise the price you pay.


댓글